Thursday, September 28, 2017

Upcycle Crafts with Rinea Paper Foil


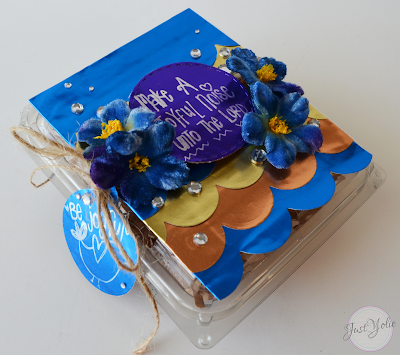
Well, Summer has officially come to an end, and the last of the Summer berries have been purchased. I save the plastic containers to reuse either as storage containers or gift boxes. Today, I show you how I used Rinea Foiled Paper, Ghost Ink and Joy Clair stamps to upcycle a berry container. Below is the list of supplies you'll need to recreate today's project, so let's get started.

Using a manual die cutting machine, I cut the circle out of the Glossy Violet/Gold foiled paper and stamped the sentiment from the Joyful Noise stamp set. I then inked the image with the Rinea Ghost Ink, removed the stamped image and wiped the ink with a baby wipe. I repeated the steps for the stamped sentiment on Sapphire/Gold foiled paper.

I die cut the scallop borders using the different color Rinea Foiled Papers and adhered them to the pre-cut Kraft paper with a tape runner.


I wrapped jute to the lid of the berry container, inserting it through the side holes and securing it with hot glue. I then took the stamped sentiment and glued it to the lid followed by the flowers and clear rhinestones.

Here is the side view of the tag I attached to the Jute.


Here is my upcycled berry container. I am so loving the stamped sentiments with the Ghost Ink! My berry container is ready for some craft goodies; I hope the recipient enjoys it as much as I did making it.


I hope you enjoyed my project today.
Thank you for visiting and happy crafting.
"Be joyful"


Supplies:

Wednesday, September 27, 2017

Christmas bookmark #DIYChristmas

Today I am sharing a gift giving idea. This Christmas metal bookmark is adorned with Christmas charms from Blue Moon Beads. It’s a great gift idea for the book lover or for anyone that appreciates handmade original gifts.


1. Wash the metal bookmark with the DecoArt® Multi-Purpose Sealer™ and allow to dry.
2. Color the metal bookmark with Le Plume Markers by Marvy®Uchida.


3. Next, add a jump ring to pre-punched hole on the metal bookmark using the jewelry pliers.  Then add the chain and the charms.

4. Add a bit of gift tissue and wrap it up!

Gift-giving made easy! I hope you enjoyed today’s project idea.

Supplies:

Tuesday, September 26, 2017

DIY Grateful Muslin Favor Bags

Hello and welcome to another Holiday countdown! Only 58 days 'til Thanksgiving! I am back with a quick and easy Thanksgiving project. I took a week off to be with family, but I am back now so let's get started. I used  Best Creation Inc.'s iron-on vinyl sheets. These are perfect for smaller projects like the muslin favor bags I decorated.


I entered the word "grateful" in Design Space and the perfect design for the muslin bags. The design has 2 layers; I ungrouped the layers and removed the bottom. I then measured the bag and arranged 4 "grateful" designs on the canvas. I trimmed the gold glitter iron-on to fit all 4 designs.


Once the elements are cut, it's time for some weeding and a little hand cutting. I used a pair of scissors to separate each design. I trimmed off the excess backing to fit on the front of the bag.


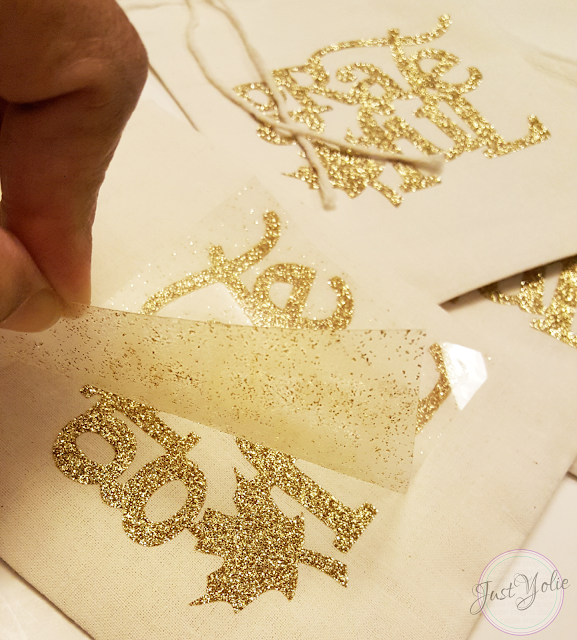
Now, preheat the iron to the highest setting. Working on hard surface works best when using a household iron. Cover the image with fabric, I use a pillow case, it's thick enough to protect the plastic and thin enough to heat set the iron-on. Then press firmly for 30 seconds. Carefully pull back the plastic. If needed, iron the back side of the fabric, but lower the iron setting to cotton or cover your design with a piece of fabric, in my case a pillow case, to avoid scorching.

Love the glittery gold!! I will be including some crafty items in the bags for some of my crafty friends. I have 8 more to decorate. I am so ahead of the game!


I hope you enjoyed my project. Please visit again Thursday a Halloween iron-on vinyl project.

As part of the Best Creation Inc. Creative Team, I received the vinyl free, but I do have a discount for you to use. Click on the image below to shop and use the code for your savings.
Thank you for stopping by.

Mini Picnic Basket #partyfavors


I wanted to paint the metal rosette especially for this mini picnic basket I picked up at Daiso. This mini gift basket can be easily decorated for gift or as party favors. With the fast approaching holidays, the basket is perfect for homemade treats.
Supply list is at the bottom of the post.

  1. Wash the metal rosette with hot soapy water. Dry thoroughly with a soft towel. Seal the front and back with the DecoArt® Multi-Purpose Sealer™ and allow to dry.

  2. Next, start painting the Classic Rosette with Colorbox® ColoriQue, Grape Vine, Turquoise Mountain and Honey Bee. Heat set with the heat gun between colors.

  3. Once the paint has completely dried, brush on a coat of the Colorbox® ColoriQue Sealant, heat set with the heat gun and set aside.

  4. Using a foam brush, paint the mini basket with black chalk paint. Add two coats and allow to dry completely.
  5. Secure the metal rosette with Beacon® Adhesive 527™ and tie a ribbon to the handle. 
     
I loved how the basket turned out. I will definitely purchase more….thinking of painting the next basket green and adding a pumpkin on the side, pumpkin spice gift idea! I would love to hear you ideas, please share them in the comments below.
Thank you for visiting today.

Supplies:

Monday, September 25, 2017

Boho Card

Happy Monday,  I have a quick card tutorial today. A bit of Bohemian, wild and free. So Boho it is! (Cue Bohemian Rhapsody).

The the list of supplies are at the bottom of the post.

1. Wash the feather with hot soapy water. Dry thoroughly.

2. Squeeze a few drops of Honey Bee ColoriQue in a palette dish and brush on the feather. Apply 2 coats and heat set between coats.
3. With the low grit sand paper, lightly sand the feather.  Apply 1 coat of the ColoriQue Sealant, heat set and set aside.

4. To create the card you will need 6 sheets of 12″ x 12″ scrapbook paper. Here are the measurements, starting with the card base working our way up on the layers: card base 12″ x 8″, score at 6″- 1st layer, 5 3/4″ x 7 3/4″- 2nd layer, 5″ x 7″- 3rd layer – 6″ x 3″ – 4th layer 3 3/7″ x 4 3/4″ – 5th layer – 3 1/2″ x 4 1/4″ – 6th layer 3″ x 4″.
5. Next trim 2 pieces for the inside liners of the card: 1st layer 5 3/4″ x 7 3/4″ – 2nd layers 5″ x 7″
6. Take the scissors and distress the edges of all the cut pieces. Using the ink pads and daubers, ink the edges of the distressed edges.
7. Adhere layer 1 & 2 with the tape runner. Before adhering layer 3 (6″ x 3″) get 2 pieces of jute and wrap it around securing with adhesive. Then continue adding the layers, including the 2 layers inside the card.

5. Add a several Nuvo Crystal and Glitter Drops using the Caribbean Ocean, Ripen Pumpkin and Emerald City. Allow to dry.

6. Tie 2 pieces of jute to the stem of the Feather and secure with a knot. Add a generous amount of Beacon® Adhesive 527™ and allow to dry.


The feather stands at 7 1/2″,  so I created the card to measure at 6″ x 8″ enough space for the size and weight of the feather, but look how gorgeous it turned out! I hope you enjoyed my project today. Here’s to the good CRAFTY life!

Thank you for visiting.
Supplies:

Thursday, September 14, 2017

DIY Jack-o-Lantern Shirts #halloweenready

Only 46 days 'til Halloween! Welcome to my blog and to another Halloween project. I am using Best Creation Inc.'s iron-on vinyl scraps to the fullest. I made 2 kids shirts using images from Cricut Design Space. Let's get started.


I searched for pumpkin designs I purchased in Design Space and found 3 I wanted to work with. I choose the smiles of the first 2 designs and the eyes of the last design.
I used the "contour" feature to hide the eyes and mouth, leaving only 2 smiles and 1 pair of eyes.
I then removed the pupils of the eyes by inserting a circle and using the "weld" feature.
Next, I made a copy of the eyes and resized them, used the "slice" feature to create the outline.
I sized the complete image to fit the front of the t-shirts. I made a copy of the Jack-o-lantern face and "flatten" the image to print on paper. I explain this in the next steps.


I grouped the smiles, noses and 1 set of eyes. I cut these in the orange glitter iron-on. It's a simple design and placing the elements on the shirt will be easy with the help of the printed copy.
I then cut the other set of eyes on black glitter iron-on.

Once the elements are cut, it's time for a little hand cutting. I used a pair of scissors to get the down the parts and a Kraft knife to cut the inside of the eyes. We will be swapping them onto the shirts.

Remember the printed copy? Well, this when it comes in handy. I used it for placement of the face. Super helpful.

Now, preheat the iron to the highest setting. Working on hard surface works best when using a household iron. Cover the image with fabric, I use a pillow case, it's thick enough to protect the plastic and thin enough to heat set the iron-on. Then press firmly for 30 seconds. Carefully pull back the plastic. If needed, iron the back side of the t-shirt, but lower the iron setting to cotton or cover your shirt with a piece of fabric, in my case a pillow case, to avoid scorching.


How cute are this Jack-o-lantern shirts!

Happy Haunting! Love Best Creation Inc.'s iron-on vinyl softness. Remember to turn the shirt inside out before washing. I don't use the dryer on any iron-on vinyl or silk screen clothes, DIY or store bought, I always line dry.


I hope you enjoyed my project. Enjoy the rest of your week and please visit again next week for a couple more iron-on vinyl projects.

As part of the Best Creation Inc. Creative Team, I received the vinyl free, but I do have a discount for you to use. Click on the image below to shop and use the code for your savings.
Thank you for stopping by.

Wednesday, September 13, 2017

Monogram Shoes with Glitter Heat Transfer

I was so excited to apply a monogram on shoes! Yes, shoes! I knew I wanted to use Best Creation Inc. gold glitter heat transfer sheets. These packs have 2 - 8.5" x 11" sheets and are great for smaller projects.
I was lucky enough to find a pair of fabric covered flats. They have cute bows, however they needed to come off to allow room for the monogram. I carefully removed the bows with a seam ripper and they were ready for some monogramming so let's get started.

I downloaded the free font Monogramos  (free for personal use) to create the monogram letters.
The font cuts perfectly without any adjustments. You will however will need to use the "hide and contour" feature to design your monogram in Cricut's Design Space. When you type in your initials in Design Space remember to keep all the letters the same size before you make any changes. Properly align the initials before cutting, then prepare the gold glitter iron-on.


I find it easier to work with their app and I can quickly reference the image to help with weeding. I start on the outside and cut the excess as I work my way through the design.

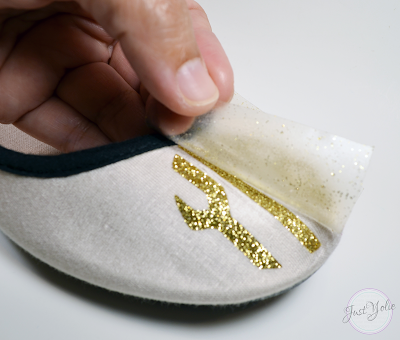
I preheat the iron to the highest setting and aligned the image to shoes. Since the shoes are fabric with very little padding, the instructions to work a hard surface worked perfectly. I used a household iron at the highest setting. Not only did I cover the image with fabric, I also made sure it covered the sole of the shoe. I use a pillow case, it's thick enough to protect the plastic and thin enough to heat set the iron-on. Then press firmly for 30 seconds. Carefully pull back the plastic.


This was by far one of the easiest and fastest project I made so far using Best Creation glitter iron-on. 


I hope you enjoyed my project. Enjoy the rest of your week and please visit again tomorrow for a Halloween iron-on projects.


As a member of the Best Creation Inc. Creative Team, I received the vinyl free, but I do have a discount for you to use. Click on the image below to shop and use the code for your savings.
Thank you for stopping by.

Tuesday, September 12, 2017

Inspirational Card with Rinea NEW Ghost Ink


So excited to share my first project using Rinea's NEW Ghost Ink.  The Ghost Ink removes the color from Rinea's foiled paper to create a reverse stamping effect and it looks fantastic! You can find the product list at the bottom of the post.

I trimmed down the Blush foiled paper to fit the warrior girl image from the Prayer Warrior stamp set. I then inked the image with the Rinea Ghost Ink, removed the stamped image and wiped the ink with a baby wipe. It really is that easy! Love it. I repeated the steps for the stamped sentiment on Copper foiled paper.


I die cut flower petals using the Glossy Gold foiled paper and using a brush added a few strokes of the Ghost Ink to the petals. I then wiped the ink off with a baby wipe and assembled my flowers with hot glue, curl the petals with my fingers and added rhinestones to the centers.


I cut all the layers of the card and started to assemble my card using a tape runner. I added chipboard to the warrior girl and the sentiment for added dimension. I used hot glue to adhere them along with the flowers.


Here is my completed card. Simply love the Ghost Ink! I am so looking forward to sharing my next project using Rinea's Ghost Ink on their foiled paper.

I hope you enjoyed my project today.
Thank you for visiting and happy crafting. "Be brave"


Supplies: