Thursday, February 28, 2019

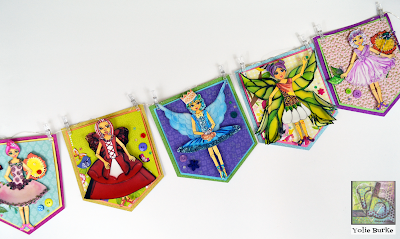
Lights, Camera, FAIRIES! #ritabarakat

I believe in fairies. There I said it.
Rita Barakat’s Magical Theatre has the right elements to spark any imagination into a creative journey of a woodland fairy tale. Go ahead, power off your family devices and make this a family project. It’s time to get creative.


As I dressed and posed the fairies and ballerinas, I could see their personalities taking shape. These woodland beauties are straight out of an ancient enchanted forest.  For example, Bluebell Fairy is a ballerina in a pointe stance cradling a blue bird in its nest. She will nurse it back to health before returning it to its home. I have a back-story for each one and you can too. I created the banner for a Fairy birthday party gathering, but you can create anything with the Magical Theatre with all its many enchanting scenery and adorable images. 

My photos were taken in dim light so you can see how cute the LED lights.


Here is a photo of the banner in natural light. Love my fairies.

Thank you for visiting and enjoy the rest of your week.

Monday, February 25, 2019

DIY Travelers Notebook #GypsySoulLaserCuts


Time to rewatch the Oscar nominated movies! I have watched Roma several times and so happy it won Best Foreign Film, but let's get to my project. Fitting for the Oscar buzz that follows last night's ceremony, I created a traveler's notebook to jot down my thoughts, favorite movie quotes and photos of my favorite gowns.

I used Gypsy Soul Laser Cuts Stars & Flourishes Border and Corners with Graphic 45 Vintage Hollywood Collection.


I used a metallic yellow gold reinker to paint the stars "Oscar Gold". I applied three coats for complete coverage.

My Oscar traveler's notebook insert is B6, enough space to create a collage cover. I fussy cut a few of the images, words and inked the edges. I then layered them to create a collage. I added the corner flourish on and scattered the single stars throughout the cover.

"The award goes to..." Love the Oscar Gold Stars! The shiny metallic finish looks amazing!

I trimmed a bit of the mini film and added it to the "Hollywood" sign.

Looking forward in filling up the notebook! Thank you for visiting today and happy crafting.
Supply List: 
Stars & Flourishes Border and Corner Set Item No. D134B
Graphic 45 Vintage Hollywood
Gold Metallic Reinker
Paint brush
Tim Holtz mini film strip
Tape runner
Tombow Glue
Brown Ink
Black Cardstock
Dauber
Scissors
Paper Trimmer

Monday, February 18, 2019

Water Coloring with Acrylics #RitaBarakat

I tried my hand on water coloring with acrylics. I was inspired by one of the mermaids from Rita Barakat's Mermaid Tails die cut collection.

I first started by fussy cutting the sunset and the extra white around the mermaid.


I used Plaid Crafts Folk Art acrylics to water color. I squeezed a dime size of each color and then added water until I got a transparent color. I tested each color on a piece of scrap paper before water coloring.
It really was that easy and I love the results.

I added pearls, rhinestones, ceramic word charms and flowers to embellish.


I hope you enjoyed my card. I would love to see what you water color using acrylics.

Thursday, February 14, 2019

Vintage Valentine #GypsySoulLaserCuts

Hey there, this is my last Valentine post for 2019. I used Gypsy Soul Laser Cuts to create a Vintage Valentine card for my husband. I used  Banner Border Strips and the Scribble Frame Hearts.


I prepared the laser cuts by cleaning off the soot with a damp cloth. Using tweezers, I pressed the Scribbled Frame Hearts directly onto the embossing ink pad and then sprinkled a generous amount of  Emerald Creek's Hammered Metal embossing powder. I did the same with the pendant  Scribble Frame Hearts but used the Charred Gold embossing powder. The banners are 12" in length and you can easily cut to fit your project with sharp scissors.

I distressed, inked and dogeared the paper. I added the filigree brads onto the grey pattern paper and then layered my pieces.


Here's a closer look at the amazing faux metal pieces. The Charred Gold has a bit of mercury glass finish. They both look fabulous.


I hope you enjoyed my vintage Valentine. Enjoy your week and make it a creative one!

Supply List:
Banner Border Strips Item D34D

Scribble Frame Hearts Item D23D
DCWV Vintage Stack
Beacon Power-Tac Glue
Emerald Creek Charred Gold Embossing Powder
Emerald Creek Hammered Metal Embossing Powder
Embossing Heat Gun
Embossing Ink
Black Cardstock
Black and Brown Ink
Filigree Brads
Black Mini Rhinestones 
Dauber
Mini Stapler
Black Jute

Winged Heart #RitaBarakat

Playing catch up on this Valentine's Day with a bit of mixed media card using Rita Barakat's Heart Wing Art Foamies stamp and Fairy Wings Gold Embossing Powder.


I used some left over buffalo plaid from a Christmas project. On one of the paper I used the Fairy Wings Gold embossing powder for a gold translucent look and then used an embossing folder for added texture.


I added black and red Folk Art acrylic paint directly onto the Heart Wing Art Foamies stamp and stamped it on kraft paper. Once dried I fussy cut the image with Westcott non-stick scissors and curled the wings for added dimension. On the scrap of kraft paper, I used Plaid's Folk Art black acrylic paint to brush on "xo" to create my own pattern paper.

I shaped piece of red wire and added to the card to embellish, but it still needed a little something. So I found a roller stamp with the words "love love love". It was small enough to include on the heart.
I hope you enjoyed my mixed media Valentine!

Valentine's Day Gift Bag #RitaBarakat

Happy Valentine's Day! I've been experiences some issues with my blog and this project was meant to be shared earlier, but here it's here now.

I used Rita Barakat's Magical Theater Book to decorate a kraft bag that would have otherwise been tossed out. You can't see it but there is a large tear that I taped on the inside of the bag and outside. The bandage up bag has been given a new life!

I have the Magical Theater Book in printable format and printed the dolls on white card stock and some of the accessories such as the wings and flowers on printable vellum and let me tell you printable vellum has come a long way. It no longer takes hours to dry and no smudging!

I printed the pages I wanted to use and then fussy cut them with Westcott Non-Stick scissors. I added a bit of color to her skin tone with a Copic maker. I strategically added Scrapbook Adhesives Foam Squares. I added them between the layers of her butterfly wings and then added them to her back for even more dimension.

I used a print & cut banner on my Cricut along with a tag. I added the gold hearts for more pop.

The woodland background is also printed on vellum. The vellum looks AMAZING!

I hope you enjoyed my project today! And remember if you can salvage a torn bag, please do and give it another chance!