Thursday, October 29, 2015

Halloween Banner #DCWV

Just a couple more days 'til Halloween!  Here's a banner using DCWV's The Spooky Delight 12"x12" Stack.

With the help of the Cricut Explore Air, I designed the "torn edge" pendant.  I used an image from a Halloween label, copy and pasted along the edges of the banner.  Used the "weld" function to create the torn jagged edge pendant leaving the corners of the pendant visible for alignment of the top layer.  I used black card stock to cut and the used different pattern papers from The Spooky Delight Stack to cut the top layer of the pendant.

I used the eBrush to darken the edges with a black Sharpie:


The "31" is also a Cricut Design Space image.  I stamped the "Happy Halloween" using Pink and Main's "Witch House" and adhered with  Glue Dots for dimension.


Any last minute preparations for Halloween?  I still have some baking to do and more treat bags to put together.
Thank you for visiting and have a safe and Happy Halloween.

Thursday, October 22, 2015

NEW #DreamingTree Christmas Collection


This Christmas Collection will be available on Friday! The latest "bendy cards" from Dreaming Tree!  Can't wait to create with these!  Their files are so easy to assemble.

Don't miss out on this release or future releases, sign up for their newsletter.  Or you can stalk their Facebook page for the announcement, that's what I plan to do! {Laugh}

And they are also giving away a Cricut Explore Air on their Facebook page!!  Click here to enter, but first you must like their page!  Good luck!!!

Tuesday, October 20, 2015

Clutch Bag #eBrush

I have another project to share with the  Wanderlust Collection.  using Craftwell's eBrush.


In addition to the Wanderlust Collection, I used Teresa Collins' dies and vellum word stickers; a pink and gold Sharpie markers; clear rhinestones; pop dots; the eBrush.

I used the flower die to cut pink and black flowers.  I wasn't sure which one I would use so I cut both.  I also cut a heart border on chipboard and used it as a stencil.


The gift bag {clutch bag} is a pattern from SVG Cuts.  I used two of the gorgeous gold foil patterns and the black stripe pattern paper for the sides of the bag, all from the Wanderlust collection.  The bag measures 7 1/4" x 10".


I went with the pink flower.  I eBrushed the edges, used pop dots for each layer of the flower and embellished the center with clear rhinestones.


I used the heart border as a stencil and lightly eBrushed it with a pink Sharpie.  I then adhered the Eiffel tower die cut from the Wanderlust ephemera. The "love" is a vellum sticker from the retried collection Hello My Name Is, I eBrushed it with the gold Sharpie and then embellished with clear rhinestones.


Change up the paper and this gift bag can be made for the upcoming holidays.  I hope you enjoy my project today.  


Thank you for visiting.


Thursday, October 15, 2015

Be a Blessing #LatinaCrafter


This week, Latina Crafter released a new line of stamps, Be a Blessing for Bible Art Journaling.  I had the privilege to create in my Bible with the stamp set Be the Light

I have seen the beautiful Bible Journaling pages in my Instagram feed and thought, I wouldn't be able to create in my Bible, but after watching Rebekah R. Jones' amazing Bible journaling tutorials, I had a second thought, but even then I didn't start.  It wasn't until I watched a video of a TV personality, sharing the story of her late husband's Bible.  A Bible that was passed onto him by his mother.  In there she journaled the hardships they experienced during the Great Depression.  I was moved to tears.  I knew right at that moment, I wanted to start journaling in my Bible.

And so here I am sharing one of my pages with you.  I have learned plenty of tips from watching Rebekah's tutorials.  If this is new for you and it's something you would like to start, I highly recommend you start watching her tutorials.  She has a weekly Bible verse challenge that include different art mediums you can use.  Not only does provide art tutorials but also delivers a beautiful study on that week's scripture.

Today I am sharing my page from Rebekah's Week 30 Challenge, Mathew 5: 14-16
14 “You are the light of the world. A city set on a hill cannot be hidden. 15 Nor do people light a lamp and put it under a basket, but on a stand, and it gives light to all in the house. 16 In the same way, let your light shine before others, so that they may see your good works and give glory to your Father who is in heaven.


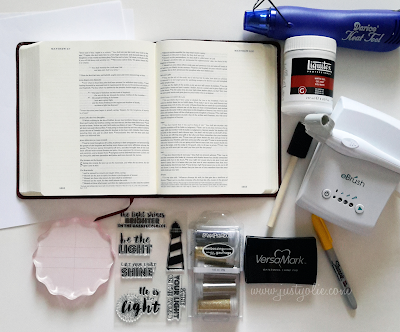
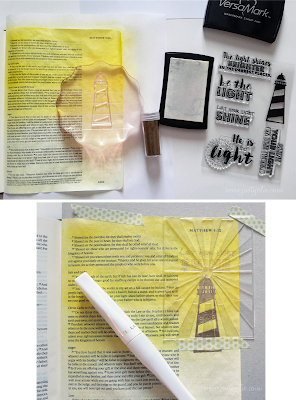
In addition to the supplies in the photo, I used Latina Crafter's Classic ABC stamp set, Let Your Light Shine stencil, clear Wink of Stella and washi tape.


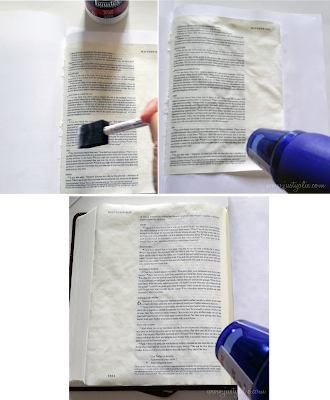
Start by protecting the pages before and behind the page you plan to journal on.  Apply a  thin layer of the Matte Gel with a sponge brush.  Keeping your heat gun at a safe distance, dry the front and back of your page.  Passing the heat gun on the backside helps with the wrinkles.


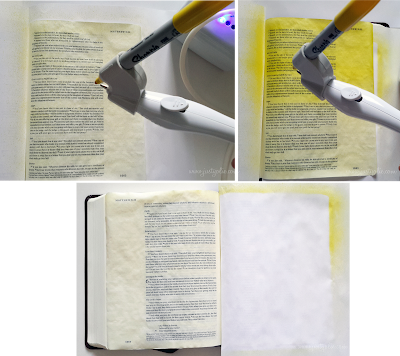
Instead of coloring pencils as stated in Week 30 Challenge, I used my eBrush to cover my page.  Please use what you have.  If you have watercolors, acrylics, color pencils use them.
I used a yellow Sharpie with my eBrush I sprayed the whole page using the first setting on the machine.   I then used the eBrush on the third setting to spray the top portion of the page, as that is where I will be stamping and adding light to the page.
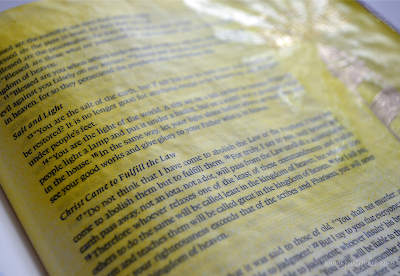
On the third photo, I flipped the page so you can see there is no color bleeding on the page.  

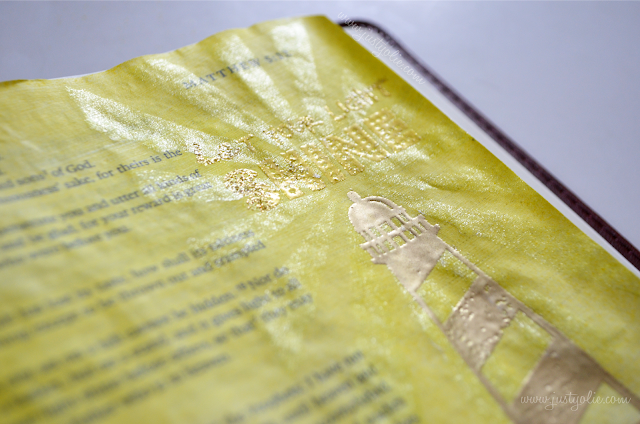
I heat embossed the sayings and the lighthouse with gold and shimmer gold embossing powders.  I then secured the sunburst stencil and the page with washi tape and went over it with clear Wink of Stella.


Here you can see the shimmer of the Wink of Stella on the light burst.


And here is my full page.  I have added my personal thoughts after I took my photos.  I hope you enjoyed the my tutorial.


Thank you for joining me today.

Halloween Mini Gift Box #eBrush

I'm on the Craftwell blog today, with another project with this month's sponsor Teresa Collins Designs.  This month we are featuring the Wanderlust Collection. 


In addition to the Wanderlust Collection, I used Cricut Explore Air, black and silver metallic Sharpie markers; clear rhinestones; adhesive tape, clear dots; modeling paste; Halloween stamps, I'm using Pink and Main's Witch House; ribbon and of course the eBrush.

I used the Cricut Explore Air to cut the box, the spider web stencil and spider.  I used the clear Black Polka Dot transparency for the lid and the gray pattern paper for the base of the box.  I cut the spider web stencil and spider from scraps.


I used paper clips to hold the stencil in place and applied Teresa Collins modeling paste.  I waited for the modeling paste to dry and placed the stencil so I can eBrush the image with a black Sharpie.

I wasn't feeling the black spider web, so I removed the stencil and eBrushed the image with the silver metallic Sharpie.  I then replaced the stencil and eBrushed it with the black Sharpie. {photo missing}
I then cut a tag from Chevron pattern paper and lightly eBrushed it with the silver metallic Sharpie to allow for stamping.  I also used the black Sharpie around the edges.


Here is my Halloween gift box.  I used ribbon I've been hoarding forever and a day and blinged out the spider just a bit.


I used the sentiment and the bats from Pink and Main's Witch House stamp set.  I used black Staz On ink, but silver metallic Sharpie still came through.  I like it!  The bats look like they're flying out from some creepy Halloween fog. {laugh} 


Here is a close up of the spider web image. 


The gift box measures 3" h x 6" l x 3.25" d  A good size for two small cupcakes or chocolate chip cookies!

Thank you for stopping by.


Friday, October 9, 2015

Halloween Paperscape Box Card #PinkandMain


This is my first ever Paperscape Box Card using Dreaming Tree's new files and it was fast and easy to create.  I am so excited to see Dreaming Tree up and running.  They are having a grand opening sale and are offering the Collector's Starter Bundle  at a low price, plus you get the just released Halloween Paperscape Bundle FREE, for a limited time so hurry.


I used DCWV The Spooky Delight 12"x12" stack and stamped the potion bottles and the "Happy Halloween" with Pink and Main's "Witch House" stamp set.  The Paperscape box card flattens for easy mailing.  The file includes a svg envelope especially for this card.


Here is how it looks with the LED tea light.  You can easily make this larger and use it for Halloween home decor. 


Here's a screenshot of the Dreaming Tree cart, make sure add "freegift" in the coupon field and click apply.   I have already purchased the starter bundle.  I won't be missing out on any of their files.


Here is the Pink and Main stamp set I used:

Thanks for stopping by!

Friday, October 2, 2015

Always Remember - Journal Clipboard #eBrush

Yes, a new month and a new eBrush sponsor.  This month we are featuring Teresa Collins Wanderlust Collection.  I absolutely in love with all the gold!!  Today I'm sharing journal clipboard.


In addition to the Wanderlust Collection, I used Teresa Collins' stencils, tags, library pocket, glassine bag and her retired stamp set Everyday Moments; a black and gold Sharpie markers; the eBrush.

I first took the manila tag and used the black Sharpie to eBrush the edge.


Next, I used the hearts stencil and the gold Sharpie on the glassine bag.

Lastly, I used the damask stencil and eBrushed the library pocket with the gold Sharpie.

I used different pattern papers, stickers and die cuts from the Wanderlust collection.  The tab "today" and the word "always" were stamped with the Everyday Moments stamp set.  Additionally, I used gold jewelry string on the back of the library pocket.


Here's a closer look.  The clipboard was a dollar find at Target and I just love how my Gold journal clipboard turned out.

The glassine bag holds journal cards, with the help of the "today" tab, I can easily open the bag to store them.


Here is a closer look at the hand stamped journal cards.  Again, I used the Everyday Moments stamp set. 

Thank you for stopping by today and enjoy your weekend.