Friday, December 18, 2015

Special Announcement


A crafty dream come true!  I am super excited to announce I am an official CHA Designer Member.   Lots of work to get to this point, but I have been guided by some pretty amazing friends, better known as Craft Angels!  Thank you for your help and guidance.

I am part of some pretty amazing teams.  I have been part of the Social Media Design Team for DCWV for a year.  I am currently serving my second design team term with Craftwell.  I have been with Latina Crafter for three years and last but not least, I have been working with Michelle from Pink and Main Stamps for three years.  They have all been so wonderful to me, from the bottom of my heart, a BIG thank you and a ginormous hug of gratitude!

I have been super busy crafting for the CHA Super Show the first week of January.  This will be my second time attending, but my first as a CHA Designer Member. I am excited to see where this journey takes me!  Thank you!

Wrapping Up Christmas #DCWV


I'm on the DCWV blog today sharing the star box I made for one of my sister's gift.  I'm giving my three sisters the same thing, so I need to make two more of these star boxes.  
I used The Merry Memories Stack, sequins and rhinestones to embellish.  To cut the pattern, I used the Cricut Explore and adhered the box with Scor Tape.


The star box is from Dreaming Tree's new O' Christmas Tree collection.  It's a pretty good size measuring 12 1/2" height x 5 1/2" wide and 4 1/4" in depth. 


Are you still shopping for gifts? Or do you pretty much have everything wrapped up?
I shop early, but I always seem to scramble for last minute gifts and less than half of the gifts are wrapped, so this weekend it's all about getting them wrapped.

Check out Dreaming Tree's FREE files.  A new Christmas Tree tag was added this week. Perfect for those gifts I need to wrap up this weekend, including this gift.


Thanks for visiting and happy weekend.

Thursday, December 17, 2015

Fifty & Fabulous #DCWV

Merriam Webster's definition of party:

party noun par·ty \ˈpär-tē\
a social event in which entertainment, food, and drinks are provided

I would like to add to that definition to include; photo props, a back drop and FUN is a certainty.

We recently celebrated my sister's 50th birthday. It was a small gathering, but it was loads of FUN!

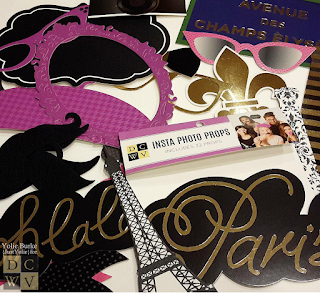
I used items from DCWV'S new Insta Photo Fun Collection; the Photo Fun Paris photo props, the All That Glitters backdrop.  I also used The Glitzy Stack and Le Blank Stack. All of the product is available at Joann's. 


Here you have the Insta Photo Props.  I used hot glue to attach the wooden holders which are included in the package.
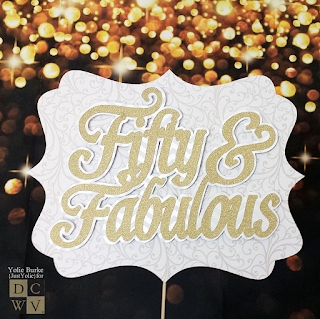
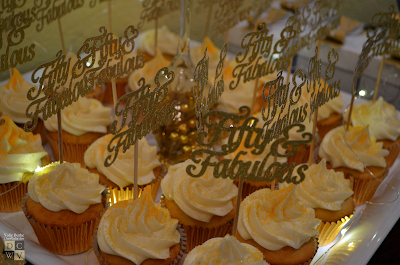
I also made a Fifty & Fabulous sign using the Le Blanc Stack and The Glitzy Stack.

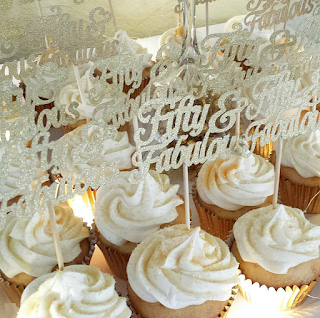
"Fifty & Fabulous" is my own designed.  I resized it to make the cupcake toppers using The Glitzy Stack. 

I placed the starry lights around the cupcakes. Difficult to capture on camera, but they sure did look spectacular.

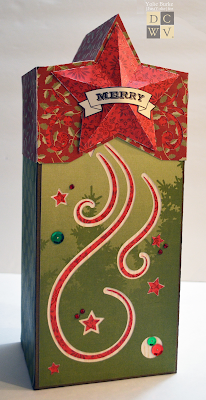
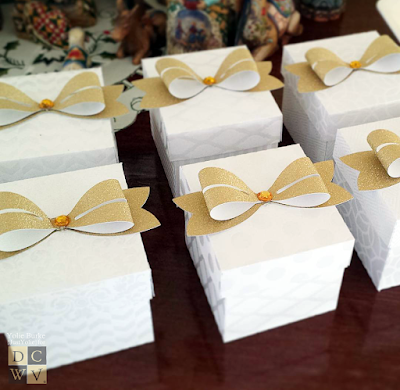
Here are the glammed up favor boxes.  I used the Le Blanc Stack for the boxes and The Glitzy Stack for the gorgeous bow.  Both the box and the bow are SVG files from The Cutting Cafe.


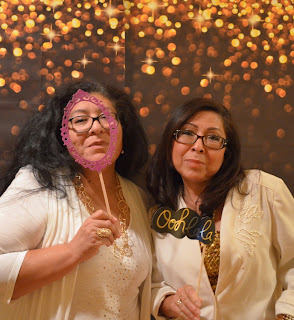
Ooh la la, my sister and I with photo props, (I'm on the left).  But how about that backdrop!  My brother and his little family took their Christmas photo that day.  Can't wait to receive their Christmas card.

And here is my sister, Fifty and Fabulous!!

I hope you enjoyed the projects today.  Remember no matter how big or small your party is, include Photo Props and a back drop.

Thanks for visiting today.


Tuesday, December 15, 2015

Frosty Party #DCWV


Less than 2 weeks 'til Christmas!  My favorite time of the year.  Are you ready?
Today I'm sharing the Wintery favor boxes from the DCWV DIY Project Stack and a snowflake garland from the DIY Project Stack Ornaments.  Both stacks available at your local Joann's store.

You will need scissors, craft knife, pencil and glue.  You may also grab your favorite ribbon and inks.  I used various May Arts Ribbon and inks to ink the edges of the favor boxes.

There are different templates you can choose for the favor boxes, I used the pillow box, mini square box and the puffy box.  The paper bows, snowflakes, labels are all die cuts you can easily punch out.  You may need the craft knife on the snowflakes.


Here's the a look at the favor boxes.  They looks so Wintery and Festive!

The snowflake garland/banner measures about 3 yards.  You can't tell by the photo, but both sides have glitter and are white chipboard. 


Looking at this collection has me wishing for snow in Southern California, but will settle for some rain.

I'm loving these cool winter blues so much, I'm inspired to include a Wintery Vignette in my home.

I also want to share, May Arts Ribbon's retail store, Ribbon Resource,  is offering free shipping and every order placed gets a free Christmas ribbon spool.  Use code: FREESHIP

Friday, December 11, 2015

Christmas Gift Boxes #eBrush

It's all about quick crafts today!  I put together a couple of gift boxes  using FREE svg files from Dreaming Tree.  Here's what you will need:  Christmas paper,  I used DCWV Hand Painted Christmas,  ribbon, embellishments and of course the eBrush with red and green Sharpies.


I used the Cricut Explore Air to cut the boxes. These are One-Piece boxes using 1 sheet of 12"x12" paper for each box.  As I mentioned before they are FREE svg files by Dreaming Tree.  You can find them here.


I used the first setting on the eBrush and airbrushed the red on the take out box and green on the Christmas Tree favor box.  Quick and easy.


I used twine, ribbon and a jingle bell to embellish.  The tag on the box is a cut-out included in the DCWV paper stack.  The twine and jingle bell from my stash.  The burlap ribbon on the box is by May Arts.


If you don't already own the eBrush, today is the last day to take advantage of the eBrush Bundle!
It's $99.99 for eBrush + siphon bundle + free battery (reg. $189.99), 20% off ALL accessories!
+ $5 flat rate shipping for all orders
Promo code: DECKHALLS


I hope you enjoyed my projects today.  Thank you for stopping by today and enjoy your weekend.

Friday, December 4, 2015

Starry Envelopes #eBrush

I have a quick project to share with you today.  I made a couple of bag/envelopes using The Cutting Cafe's Goodie Bags.  You will need Christmas paper, thinner weight paper works best.  I used DCWV Holiday Letters,  Latina Crafter's star stencil from July's Kit, ribbon, embellishments, silver metallic Sharpie and the eBrush.

The stencil was smaller than the bag, so I masked of the bottom and side.  I also tucked a piece of scrap paper in the envelope to cover the inside of the envelope.


I stamped the sentiment, "May your light shine bright this Christmas" by Latina Crafter with Delicata Silvery Shimmery pigment ink.  The photos don't do it justice.


Here are additional photos.


If you don't already own the eBrush, today is the last day to take advantage of the the epic sale on this amazing machine.


I hope you enjoyed my project today.  Thank you for stopping by today and enjoy your weekend.

Saturday, November 28, 2015

The Magic of Christmas Blog Hop

Welcome to the SVG Attic-DCWV The Magic of Christmas blog hop! We are so excited to have you join us today!
At each stop of the hop we hope you will be inspired by the creativity of the design teams of SVG Attic and DCWV. You are sure to find many wonderful projects that will be at the top of your Christmas crafting lists!

You should be arriving from Lisa's blog. If you happened across this post out of order, please head to the SVG Attic blog to start at the beginning of the hop.

Here is the Christmas 9"x12" canvas  I created using Winter Wishes with DCWV Hand-Painted Christmas Stack:


I used the "Merry Christmas" card design and sized it to 8.5" x 4.25".  Here is a photo of the collection as it appears on the SVG Attic web site:


Now how about some blog hop prizes??

2 Christmas paper stacks from DCWV

$20 Gift Certificate to SVG Attic

1 Christmas paper stack from DCWV

What do you need to do to be eligible for these amazing prizes?
1. Become a follower and/or email subscriber of each blog in the hop.
2. Leave some comment love at each stop. You can do so until midnight on Sunday, November 29th to be eligible for the prizes.
3. If you do both of the above, check back at the SVG Attic blog and/or the DCWV blog for the winners on Tuesday, December 1st.

We would also love it if you would stop by the SVG Attic and DCWV Facebook pages and give us a "Like"!

Thank you for hopping with us!  Now please stop by the DCWV Blog for the last stop of the hop!

Here is the complete blog hop lineup:
Yolie {You are here} 

DCWV blog {Your next stop}

I hope you have enjoyed this stop on our hop! Be sure to head on over to the other stops for more Christmas inspiration. Comment and become a follower to be eligible for the prizes!

SVG Attic currently has all of their files on SALE for Black Friday/Cyber Monday! Stop by their website at www.svgattic.com to purchase their SVG files at amazing prices.  Also, DCWV papers are on sale at Michael's stores right now, so stock up so you can create all of the fun things you saw today!

Friday, November 20, 2015

Thankful #DCWV

Family gatherings and a mega feast, yes it's almost time for Thanksgiving.  So much to be thankful this year.  As the year comes to an end, Thanksgiving is a good time to reflect and give thanks.  I am so thankful for my family, husband, a circle of frends and ever so grateful everyone is healthy. 

Today I'm sharing Thanksgiving decor using DCWV's The Harvest House 12"x12" Stack.

This year my sister Lu is hosting Thanksgiving.  This home decor piece is a gift for her.  I painted the wood frame by Fab Lab with orange DecoArt paint.  I purchased the wood frame from Joann's during their Fall clearance.  They are no longer available, but the good news they have Christmas theme wood frames available.


I used the Cricut Explore to cut the flowers, leaves and the Thankful.


I used the chevron pattern paper to cover the backside of the pumpkin and adhered the "thankful" with Glue Dots.   I added the leaves to the burlap bow and hot glued it to the frame.  I then realize the bow was missing a little something so I added another bow.  I layered a bow using May Arts leaf linen ribbon and added the flower to the center.  Don't miss out May Arts Black Friday Weekend sale save 20% off their retail shop, The Ribbon Resource. 

Here are a couple of close up photos.


Are you still decorating for the great gathering?  Will you be doing anything different this Thanksgiving or sticking to traditions?

I hope you enjoyed my project and thank you for visiting.

Wednesday, November 18, 2015

December 25th - Joy


I created with  a home decor with the JOY corrugated word and used Christmas paper by Doodlebug Design.  This cutie is ready for Christmas!  She originally sits on a present, but I cut the present to have her sit on the JOY.
Since this is a digital image, I resized to to fit the JOY word and colored her with Spectrum Noir markers.


Thank you for visiting!


Friday, November 13, 2015

Christmas Morning #eBrush

Happy Friday, sharing today's project for Team eBrush from this month's sponsor, Dreaming Tree . Today I'm sharing a Christmas Morning scene from the new Christmas Bendi Card Collection  The collection has 3 different designs and are alsoavailable to purchase as single designs.   


I used the perfect paper for my Bendi card The Merry Memories Stack by DCWV.   I used the eBrush with Spectrum Noir markers for shading, you will also need your favorite liquid glue and embellishments.  The Bendi Card Collection are meant to be mailed, however I cut the design larger to use for Christmas decor.


Here are all the parts of the cards shaded and ready to be assembled.  The card is easy to assemble, but if you should need a little help, Dreaming Tree includes detailed PDF assembly instructions and step-by-step video with all of their collections.

Here is the Christmas Bendi Card assembled.  Notice the cardinals hanging out by the windows?  {smile}

Here is another view.  I used pop dots on the wood panel for even more dimension.   I used gold foil paper to cut the children silhouettes, a little difficult to capture, but it looks great in person.  The file comes with Mom and Dad silhouettes, but I prefer to have unsupervised children on Christmas morning. 


I hope you enjoyed my project today.  Thank you for stopping by today and enjoy your weekend.