Thursday, August 31, 2017

DIY Mini Halloween Canvas Bags

Sticking to a Halloween post a week 'til Halloween, I bring you this week's project. I am using Best Creation Inc.'s iron-on vinyl to make these cute mini canvas bags. I am using every bit of iron-on scraps so let's get started.

I purchase the mini white canvas tote for .50 at my local craft store. Love when that happens. You will of course need orange and black glitter iron-on vinyl.

In Cricut Design Space, I searched for "boo" and "bats".  I inserted the images onto the canvas and made a few changes. First, the "boo" is a photo prop image, so I bit of "hide contour" to only include the word "boo". Next, I unlocked the bat proportion and skewed them to appear in flight. I trimmed the iron-on vinyl and prepared to cut.

To save on iron-on vinyl, I clustered the 6 bats to cut as close as possible to each other. I also trimmed the around the word "boo" to allow room for the bats. I then used the app to reference the image for placement.

I preheat the iron to the highest setting and aligned the image to the bag. Working on hard surface works best when using a household iron. Carefully cover the image with fabric, I use a pillow case, it's thick enough to protect the plastic and thin enough to heat set the iron-on. Then press firmly for 30 seconds. Carefully pull back the plastic. If needed, iron the back side of the fabric, but lower the iron setting to cotton or cover your design with a piece of fabric, in my case a pillow case, to avoid scorching.

How cute are these mini totes! They are ready come Halloween to fill up with special treats!


I hope you enjoyed my project. Enjoy the rest of your week and please visit again next week for a couple more iron-on vinyl projects.


As a member of the Best Creation Inc. Creative Team, I received the vinyl free, but I do have a discount for you to use. Click on the image below to shop and use the code for your savings.
Thank you for stopping by.

Tuesday, August 29, 2017

DIY Travel T-Shirt #RoadTrip

Road trip! I'm getting ready for the last road trip of the season. I created a travel t-shirt using Best Creation Inc. glitter iron-on vinyl.  It was super easy to make, let's get started.

In Adobe Illustrator®, I used the Arial Narrow font, (free for personal use) to create the "Road Trip."
The font is a bit thin to cut properly on my Cricut Explore Air. I changed the offset path to make the letters easier to cut. I also changed the height. You can also create saying within Design Space, I just prefer to work in Adobe Illustrator®.
I then imported the SVG file to Cricut's Design Studio. I searched for a car image and changed the car image with the "hide contour" feature. I placed the word "road" on top and "trip" where the hood/grill of the car. I selected all and aligned the designs. Prepared the black glitter iron-on to cut.


I find it easier to work with their app and I can quickly reference the image to help with weeding. I start on the outside and cut the excess as I work my way through the design.

I preheat the iron to the highest setting and aligned the image to the t-shirt. Working on hard surface works best when using a household iron. Cover the image with fabric, I use a pillow case, it's thick enough to protect the plastic and thin enough to heat set the iron-on. Then press firmly for 30 seconds. Carefully pull back the plastic. If needed, iron the back side of the t-shirt, but lower the iron setting to cotton or cover your shirt with a piece of fabric, in my case a pillow case, to avoid scorching.

I super cute and comfy t-shirt for my road trip and so easy to create!

I hope you enjoyed my project. Enjoy the rest of your week and please visit again next week for a couple more iron-on vinyl projects.


As a member of the Best Creation Inc. Creative Team, I received the vinyl free, but I do have a discount for you to use. Click on the image below to shop and use the code for your savings.
Thank you for stopping by.

Saturday, August 26, 2017

Scrapping for Less - Flavor of the Month Blog Hop

Are you ready to walk on the wild side? Well, that is exactly the theme of our August Flavor of the Month card kit. Wild and Free with an exclusive stamp set by Pink and Main. We are so extremely happy about this kit. Come on and hop along and see what the amazing Design Team has provided this month as inspiration. 
This amazing August kit has SOLD OUT! Prior to the blog hop!...WOW! If you missed out you will want to jump on the subscription wagon so you do not miss out on September's amazing kit. Check out this page for all the details about the kits. They just keep getting better and better! Thanks for hopping along with us today. Don't forget to enter the Rafflecopter for a chance to win a complete kit!
I'm your last stop of the hop, but you may want to start from the beginning, please visit the Scrapping for Less blog.
Now onto my first card; Today, wild and free

My second card; GO SEE DO

My 3rd card; Have a dino-mite day!
And last but not least, Hello
What a super fun card kit! I loved the main kit with all the extra add-ons! Such a great value, although the August kit is sold out, you can sign up for next month's subscription.

Well, that's a;; from me! Remember to stop and comment on all stops and enter the giveaway. 
Thank you for visiting by!

Thursday, August 24, 2017

DIY Halloween T-Shirt #BestCreationInc

A Halloween post a week 'til Halloween is the plan! Today's Halloween project is simply too easy. I am using Best Creation Inc.'s iron-on vinyl to make my Halloween t-shirt. So far I've used the same roll of orange vinyl on 1 previous project, this is my second project with plenty of vinyl left for a few more projects. The roll contains 1 sheet of 12" x 24" which is enough for my iron-on projects. Let's get started.

I purchased a black t-shirt for a few bucks, pre-washed it, with no fabric softener and then ironed it to get the wrinkles out.

I don't do a scary Halloween, so I searched for a cute image in Cricut's Design Space. I found one I owned by searching the word "boo".  I inserted the image to the canvas and resized it to fit the front of my shirt. I trimmed the iron-on vinyl and prepared to cut it.

I find it easier to work with their app and I can quickly reference the mirrored image to help weed the vinyl. I start on the outside and cut the excess as I work my way through the weeding.


I preheat the iron to the highest setting and aligned the image to the t-shirt. Working on hard surface works best when using a household iron. Cover the image with fabric, I use a pillow case, it's thick enough to protect the plastic and thin enough to heat set the iron-on. Then press firmly for 30 seconds. Carefully pull back the plastic. If needed, iron the back side of the t-shirt, but lower the iron setting to cotton or cover your shirt with a piece of fabric, in my case a pillow case, to avoid scorching.

I am so ready for Halloween! OK so it's a bit early to wear my shirt, but once September rolls in, I'm wearing my tee.

Boo, Eek Happy Haunting! Love Best Creation Inc.'s iron-on vinyl softness. Remember to turn the shirt inside out before washing. I don't use the dryer on any iron-on vinyl or silk screen clothes, DIY or store bought, I always line dry.

I hope you enjoyed my project. Enjoy the rest of your week and please visit again next week for a couple more iron-on vinyl projects.

As part of the Best Creation Inc. Creative Team, I received the vinyl free, but I do have a discount for you to use. Click on the image below to shop and use the code for your savings.
Thank you for stopping by.

DecoFun™ Bow Maker Blog Hop

Hello and welcome to the Designer Crafts Connection blog hop. Today we are featuring the DecoFun™ Bowmaker. Seriously, the easiest way to create bows. I used the ribbon from the Vintage Starter Kit, gorgeous quality satin ribbon. 

I watched the tutorial on their channel. I was surprise how easy it was to create a bow! It really is as simple as 1, 2, 3!
To create my rosette bows, I started with 2 medium size bows using the gorgeous blue ribbon. I used the twist tie wire to join both of them together. I then created 2 smaller bows using the brown cross-grain ribbon and lace ribbon. Then, I used the same wire to attached to the larger bows. 


The box was a simple Kraft box I purchased at the local craft store. I used scrapbook paper to decorate and topped it off with the DecoFun™ rosette bow. So gorgeous and so easy!

Thank you for visiting, please visit the other designers' blog for more DecoFun™ Bowmaker ideas!

Tuesday, August 22, 2017

DIY Iron-on Canvas Travel Tote

I'm having way too much fun playing with Best Creation Inc. iron-on vinyl. Today, I'm sharing a travel tote spruced up for an upcoming trip using black glitter iron-on vinyl: "Wander for a bit"

I also got to play in Adobe Illustrator® to add a few elements to the camper image (plain black). It's available for commercial use with a few versions available. However, I wanted my camper slightly different. In Illustrator®, added a few basic shapes, hearts, rounded rectangles that serve as a window and door. I added a vertical line to create the split window. I also used the same line to create some horizontal pinstripes. I modified the nodes to round off the edges of the pinstripes. Loved how my camper turned out.
I then used KG The Fighter font, (free for personal use) to create the saying, "Wander for a bit"
The font is a bit thin to cut properly on my Cricut Explore Air. I changed the offset path to make the letters easier to cut.
You can see the before and after camper on the screenshot. I'm ready to renovate a real vintage camper.

I then uploaded the SVG file to Cricut Design Space, sized to fit the canvas tote and cut it. I find it easier to work with their app and I can quickly reference the mirrored image to help weed the vinyl.

I preheat the iron to the highest setting and aligned the image to the canvas bag. Working on hard surface works best when using a household iron. Cover the image with fabric, I use a pillow case, it's thick enough to protect the plastic and thin enough to heat set the iron-on. Then press firmly for 30 seconds. Carefully pull back the plastic.

Best Creation Inc.'s iron-on vinyl is very soft, it feels sort of velvety, but has the beautiful glitter sparkle.

Here is a close up of the iron-on vinyl.

My Happy Planner will travel safely in my new DIY Tote while I wander for a bit!

As part of the Best Creation Inc. Creative Team, I received the vinyl free, but I do have a discount for you to use. Click on the image below to shop and use the code for your savings.
Thank you for stopping by.

Friday, August 18, 2017

On Trend: DIY Eyelash Zipper Pouch

I have come across plenty of eyelash zipper pouches on my social media feeds. They are super cute so it was time to make my own. I used Best Creation Inc. Iron-On Glitter in black and Metallic Iron-On Vinyl in red.

I searched the images in Cricut Design Space and found a free phone decal image perfect for the zipper pouch.
The image is winking however, I want a face with both eyes closed so I modified it using Design Space features. Below is the complete tutorial. Let's get started.

Click on the image to select and click "insert image". The image will be added onto your canvas.


I started with her lips. I wanted her lips slightly open so the first step is to "ungroup" the image. Then select the lips and make a copy. Resize it by unlocking the proportion feature. I want to elongate the copy of the lips to create a opening on her mouth. Change the color to white and center it on the middle of the mouth. Then select both and click "group".


I want both eyes to be closed, using the "contour" feature, I hid the left eye. I then selected the right eye and made a copy. Next, I aligned it and then flipped it horizontal.


Now this is the face I want! So cute! We are almost done.
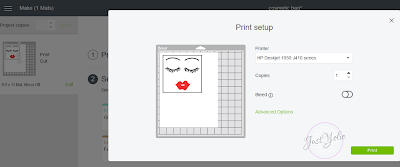
Next, select the face and make a copy. Select the copy and choose "flatten". We are going to to use the Print & Cut feature to print copy to help with the placement of the cut vinyl onto the pouch.


Print a copy and then cancel the "cut". We only need the paper copy.


Now we are ready to cut the iron-on. I don't like to waste vinyl, so I ungrouped the eyes and placed them as close as possible. I then used the "attach" feature to prepare for cutting and clicked on the attached image to get the size. I use this measurement to cut the black glitter iron-on. I repeated the same steps for the lips.

Using scissors, I trimmed the eyebrows and eyelashes, then weeded the unwanted vinyl. I used the printed copy of the face as a guide to place the vinyl. Prepare the iron to the high setting, cover the vinyl with a cloth, add enough pressure and iron-on vinyl for 30 seconds.

She's a beauty! Glittery eyebrows, eyelashes and high gloss lipstick!


She needed a little something so I added a red pom pom.

This trendy eyelash pouch was super easy to make. I may have to make more for gifts!


As part of the Best Creation Inc. Creative Team, I received the vinyl free, but I do have a discount for you to use. Click on the image below to shop and use the code for your savings.
Thank you for stopping by.