Thursday, May 24, 2018

Ghost Stamping

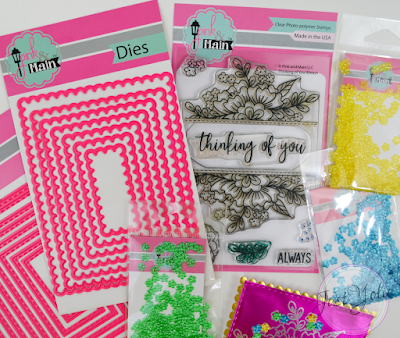
 I love the look of Ghost stamping on Rinea's foiled paper. It's easy and the outcome is fantastic. For my card, I used Rinea's Fuchsia/Gold Glossy Foiled Paper Pack and Ghost Ink.


I trimmed a sheet of Fuschia/Gold Glossy foiled paper and aligned the Pink and Main's Floral stamp. Next, I used the Ghost Ink, allowed the ink to dry and then gently removed the ink with a baby wipe. I then repeated the steps to stamp the "thinking of you" wording.

.
I used Pink and Main's Stitched die to cut the stamped Fuchsia/Gold Glossy sheet and then used the backside,Glossy Gold, to die cut the scallop panel. Next, I added adhesive to and carefully aligned the top layer to the bottom. Then, I cut the card base out of white card stock. I was going to leave the card as is, but I added Pink and Main's cute flower sequins to add on the stamped image.


How I love the Fuschia/Gold Glossy on this card! The flower sequins look so pretty.


The results are simply gorgeous and so easy to achieve.


Thank you for visiting and happy crafting.


Thursday, May 17, 2018

Altered Box

Welcome to the May Blog Hop sponsored by Expo International. I received scalloped stretch lace with a couple of rose iron-on appliques and pom fringe trim, that's always fun. I picked up a burlap covered box at my local craft store to alter.


I first measured the boxes and cut the pom fringe trim. I used hot glue to adhere to the lid. Next, I added the scalloped stretch lace to the bottom sides of the box. The lace is light so I sparingly added the hot glue to avoid lumpy spots.
I then added rhinestones along the corners of the lid.

As with all iron-on embroidered appliques, always cover the design with a light fabric to avoid scorching the design fabric.

Expo's trims and appliques make it so easy to decorate. I hope you enjoyed fun and easy project.

Wednesday, May 16, 2018

Sculpey® III DIY Necklace


Make your own jewelry with Sculpey®III clay and metal dies. That's right, I used one of my favorite flower metal dies to create a beautiful flower necklace charm. I've used the flower metal die to cut paper, foiled paper and felt. Now it's time to create with Sculpey®III clay.


I used the Metal Blade to cut the clay, rolled it into a ball next, using a silicone mat, I took the Clay Roller to evenly roll out a 3" circle. Both the Metal Blade and the Clay Roller are included in the Sculpey® Bead Making Kit.

I used my favorite flower die to gently press the pattern onto the clay and carefully removed it from the clay.

 Next, I used the Blade tool to carefully cut through the flower pattern. I trimmed off the excess clay in sections to avoid distorting the flower shape. I repeated the steps to create a smaller flower shape using the turquoise clay.

Using the Needle Tool, I created lines towards the center of the flowers. The lines don't need to meet in the center, as I will be layering the flowers and adding gemstone to the turquoise flower.
Next, I placed the clay flowers on the Baking Cushion and baked at 275°F for 15 minutes.

 Allow the clay to cool. If needed, sand the clay to remove fingerprints or imperfections. I used a 400 and 800 grit sandpaper. To avoid dust from sanding clay, I submerged the sand paper in water for a minute and sanded the flowers. I rinsed the flowers with water and dried them with a lint free cloth.

I applied two coats of the Sculpey®Glaze Satin allowing to dry between coats. After the glazed completely dried, I used a strong bond adhesive to glue the flowers together and added the gemstone. Allow to dry before gluing the bail to backside of the flower.

Measuring in at approximately 3" in diameter, it's light, not heavy at all. It turned out so beautiful.
Do you have metal dies you can use to create Sculpey® jewelry? It's fast and easy, give it a try.

I hope you have enjoyed my SculpeyIII® project tutorial as much as I did making it. I have a discount to share with you. Please use promo code justyolie to save 20%, good through 6/15/18.


Tuesday, May 15, 2018

Pretty Girl Card

 I colored Zoe with Marvy Uchida markers and paper pieced her top.

I used dies to cut the layers of the card and gathered up embellishments to decorate.

I used pop dots for dimension and I really love how it turned out.


Monday, May 14, 2018

Mexican Lotería - Altered Box

¡Lotería! There's nothing like a good game of bingo! My family has always played Lotería, Mexican bingo, and when I found an oversized set, I purchased it with a decoupage project in mind and this wooden box was it. I found a metal Sun Aura in my craft room that I painted with ColoriQue and it’s the perfect decorative piece for the game box.

I was fortunate to have found a wooden box at a thrift shop for under two dollars. It measures  6 1/2 x 9″ x 7 1/2″, a pretty decent size and I am excited to share the upcycled new look.

The Sun Aura measures 4 1/2″ diameter, I used ColoriQue Honey Bee, Poppy and Ruby Slipper to paint allowing drying time between coats.
I brushed on the Ruby Slipper to darken the ridges of the metal and I allowed it dry before applying Honey Bee along the tips.
I then took a fine detail paintbrush and brushed Poppy to accent the inner circle and applied a second and third coat of Honey Bee.

While the Sun Aura dried, I lightly sanded the wooden box to remove the dirt. I then used ColoriQue in Black Diamond to paint the edges of the box.  Next, I trimmed the large Lotería cards to fit the sides and lid. I used a foam brush to apply the decoupage glue and adhered the panels.

Allow 24 hours for the paint to dry before adding the ColoriQue Sealant.
Before adding the decorative piece to the lid, I screwed on the casters to the bottom of the box. I then trimmed the image of the sun, a cardboard piece and glued them onto the center of the lid.

I added a generous amount of glue to the backside of the metal Sun Aura and allowed to dry.

Here’s my upcycled Lotería game box and I am loving how it turned out. “El Sol” looks amazing on the lid.

And what I am storing in the game box? A Lotería game of course. The casters will make it easy to pass along the playing cards across the table.

Supplies:
  • ColorBox® ColoriQue
    • Honey Bee, Poppy, Ruby Slipper, Black Diamond, Sealant
  • Wooden box
  • Metal decorative piece
  • Bingo game
  • Decoupage glue
  • Paintbrushes
  • Foam brush
  • Paper trimmer
  • Glue
  • Casters